Create a real-time application inventory
Use Chalk to create an always up-to-date database of what code is where, and who owns it
Summary
In software organizations, people lose plenty of time asking around for information around software because they don't have a good real-time view of what they have.
For instance, when something breaks in production, ops people may not know what software they're looking at, and often lose time trying to figure out where the code lives and who owns it.
Similarly, developers often would like to know what versions of their code are deployed where, especially when a bug report comes in.
This how-to uses Chalk™ to automate this easily:
- Set up the Inventory web service (via Docker)
- Load our
app-inventoryconfiguration - Browse your data
Each of the steps involves running only a few commands.
Before you start
You should have a working installation of Chalk. The easiest way to get Chalk is to download a pre-built binary from our release page. It's a self-contained binary with no dependencies to install.
Additionally, you will need docker, as the reporting web service will be installed by running two docker containers: one for collecting logs, and the other to give us a web frontend to browse them.
Step 1: Set up the Inventory web service
For this guide, we will be running the server locally. If you do not already have it set up, follow the instructions at How-to run containers to browse Chalk data locally.
Step 2: Load our app-inventory configuration
Chalk can load remote modules to reconfigure functionality. For this guide, we will load the module app_inventory from Chalkdust, our module repository.
To load the module, run:
chalk load https://chalkdust.io/app_inventory.c4mThis will work even if you've already configured Chalk -- the load command will add the app_inventory module to your existing Chalk configuration. However, if you would like to overwrite your existing Chalk configuration instead, you can run:
chalk load --replace https://chalkdust.io/app_inventory.c4mDuring the load operation, you will be prompted to enter the IP address for the server we set up in the previous step. The default will be your personal IP address. For example:

Generally, the default should work fine for the local testing server.
After accepting the IP address, Chalk will prompt you one more time to finish the setup, and then you should see confirmation that the configuration has been successfully loaded, ex:
info:  https://chalkdust.io/app_inventory.c4m: Validating configuration.

info:  https://chalkdust.io/app_inventory.c4m: Configuration successfully validated.
info:  Configuration replaced in binary: /home/liming/workspace/chalk/chalk
The resulting binary will be fully configured and can be moved or copied to other machines without losing the configuration. The binaries will continue posting reports to the API server as long as your server container stays up and the IP address is correct.
There's nothing else you need to do to keep this new configuration -- Chalk rewrites data fields in its own binary when saving the configuration changes.
Optional Step: Populate sample data
If you do not have your own container to use for this demonstration, we can build and deploy a sample container using Chalk, allowing you to see real data in the database.
As a simple example, let's build a container that prints load averages once a minute to stdout.
First, we'll write a script for this:
cat > example.sh <<EOF
#!/bin/sh
while true
  do
    uptime
    sleep 60
  done
EOF
Now, let's create the Dockerfile:
cat > Dockerfile <<EOF
FROM alpine
COPY example.sh /
ENTRYPOINT ["/bin/sh", "example.sh"]
EOF
Now, build the container with Chalk:
chalk docker build -t loadavg:current .Along with the docker build output, you should also see a Chalk report for the build operation:
[
  {
    "_OPERATION": "build",
    "_DATETIME": "2023-10-25T16:06:52.502-04:00",
    "_CHALKS": [
      {
        "DOCKERFILE_PATH": "/home/liming/workspace/docs/Dockerfile",
        "DOCKER_FILE": "FROM alpine\nCOPY example.sh /\nENTRYPOINT [\"/bin/sh\", \"example.sh\"]\n",
        "DOCKER_LABELS": {},
        "DOCKER_TAGS": [
          "loadavg:current"
        ],
        "CHALK_ID": "GYBRP9-W198-HFTT-1JCF5Y",
        [...]
You can then run the container:
docker run -it loadavg:currentThis container will run in our terminal until we hit CTRL-C. On startup, you should see a Chalk report on exec in terminal output, ex:
 20:07:31 up 8 days,  5:18,  0 users,  load average: 2.45, 2.25, 2.46
[
  {
    "_OPERATION": "exec",
    "_DATETIME": "2023-10-25T20:07:31.546+00:00",
    "_CHALKS": [
      {
        "CHALK_ID": "GYBRP9-W198-HFTT-1JCF5Y",
        "CHALK_VERSION": "0.2.1",
        "METADATA_ID": "NJR0F2-84S5-VWEZ-62CYX7",
        "_OP_ARTIFACT_PATH": "/bin/busybox",
        "_CURRENT_HASH": "89f85a8b92bdb5ada51bd8ee0d9d687da1a759a0d80f8d012e7f8cbb3933a3a0"
      }
    ],
    [...]
Note that you do not need to run chalk docker run in this case, and will get a Chalk report with just docker run because the Chalk binary was built into the container as part of container wrapping during the chalk docker build command.
Step 3: Browse your data
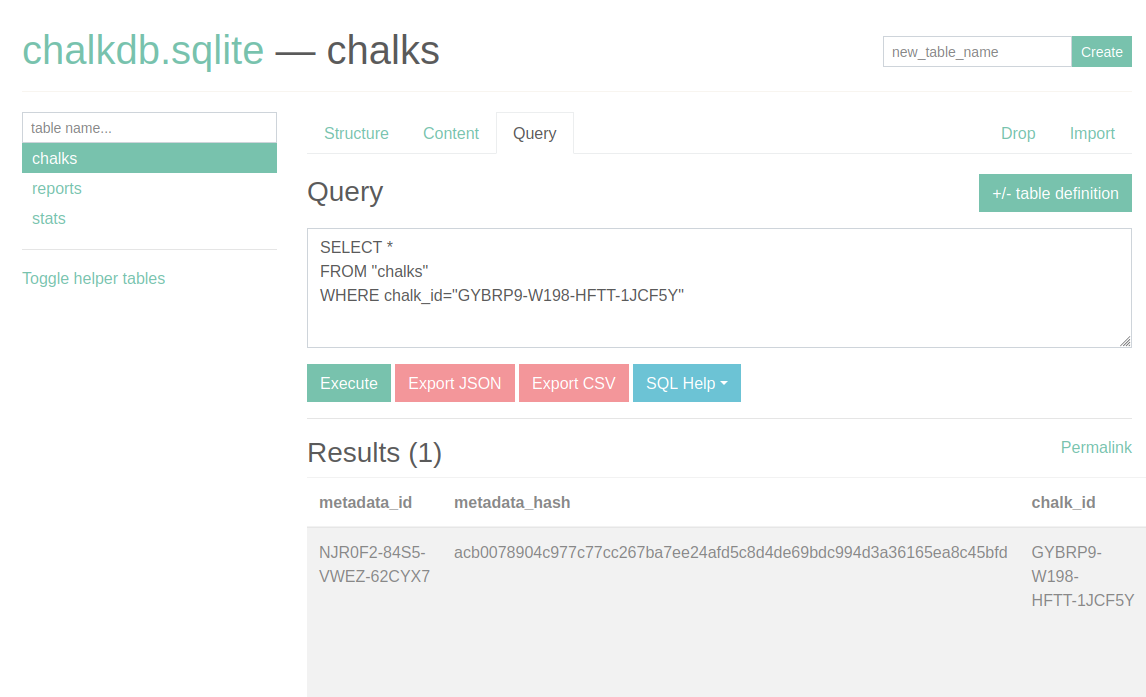
The Chalk reports for both the docker build and the docker run will be sent to the API server. You should see them in the SQLite database under the reports tab and the Chalk mark itself under the chalks tab.
For example, looking under chalks for the chalk_id which we have created above should look something like this:
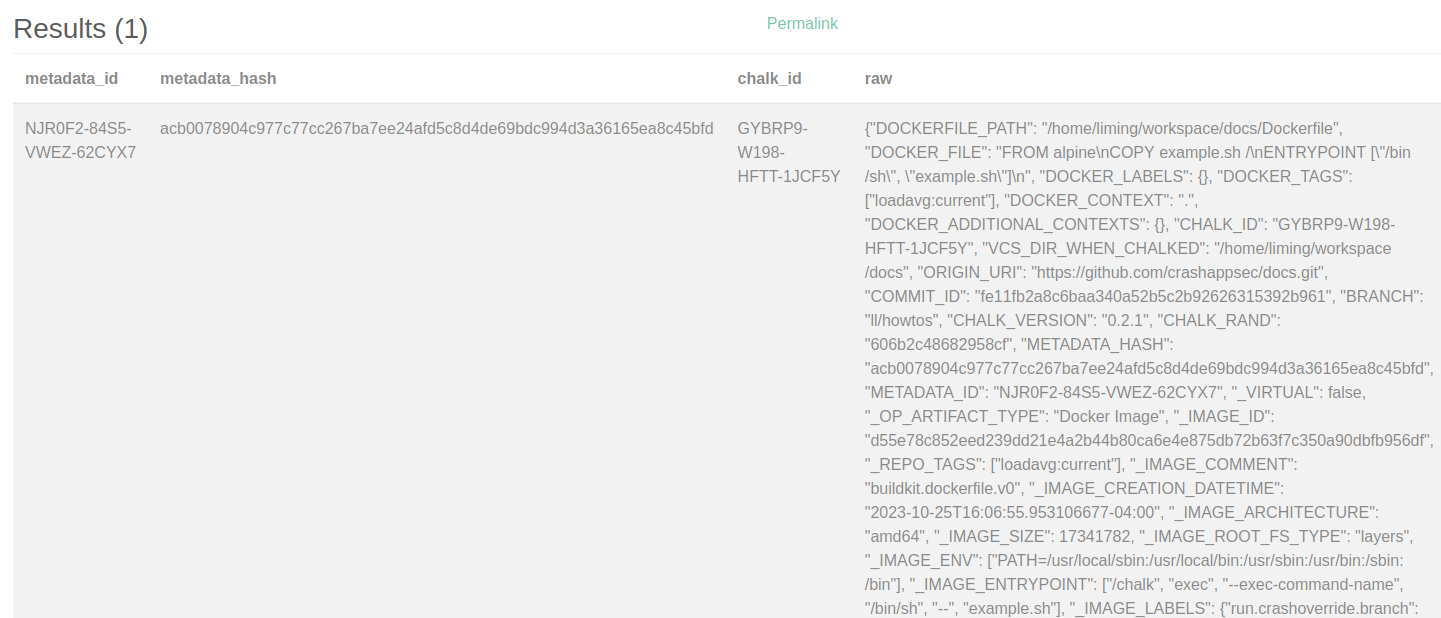
And scrolling to see the raw Chalk mark:
Similarly, in the reports tab, we can find the Chalk reports for the build and exec operations:

We can see that by using this Chalk configuration, the database will be capturing both the repositories you're using to build and the containers you deploy. The CHALK_ID field is one field that ties them together -- it will be unique per container, but be associated both with the repository information AND the containers you deploy.
❗While you may be tempted to correlate by container ID, note that Docker
pushoperations will generally result in the remote container being different, so running containers are very likely to report different image IDs. Chalk does capture the relationship when wrappingdocker push, but you'll have to go through extra work to link them together. Using the CHALK_ID is the simplest way to correlate containers and images.
Everything that gets Chalked will get its own Chalk mark (with unique chalk id) that can be viewed in the SQLite database. Go ahead and Chalk some more docker builds or binaries. You can then view all of these Chalked applications in the database:

And now we have our application inventory!
If you like Chalk, you can easily deploy across your Docker builds and deploys by creating a renamed binary or adding a global alias. See the how-to for docker deployment
Warning
This how-to was written for local demonstration purposes only. There are no security considerations taken in this how-to. You should always have AuthN/AuthZ and use SSL at an absolute minimum.
Our cloud platform
While creating a basic app inventory with Chalk is easy, our cloud platform makes it even easier. It is designed for enterprise deployments and provides additional functionality, including pre-built configurations to solve common tasks, prebuilt integrations to enrich your data, a built-in query editor, an API, and more.
There are both free and paid plans. You can join the waiting list for early access.
Background Information
Traditionally, IT departments maintained lists of their hardware and software assets in a configuration management data base (CMDB). These systems were not designed for modern cloud-based software and the complexity of code that they are made from.
Spotify created a project called Backstage to centralize developer documentation. Many companies now use it as a source of truth for their development teams.
Many companies create application inventories using spreadsheets.