Getting Started with Chalk
Chalk is an observability tool that provides full lifecycle visibility
into your development process. Generally, you apply Chalk at build time,
where it adds informational marks to software (chalk marks) and
reports about the software and the build environment. You can also
configure it to wrap workloads to report on them in production.
A design goal for Chalk is that people deploying it shouldn't have to do more than drop in a single Chalk binary in the right place in their CI/CD pipeline. In many cases, it can be completely transparent to the user.
Any configuration should be done up-front by whoever needs the data from Chalk. While Chalk is designed to be deeply customizable, we also worked hard to make out-of-the-box configurations useful and to make it very easy to configure common use cases.
First, let's do some basics to get up and running, both with chalking artifacts and reporting on them in production.
Chalk Binary
There are several ways to get the Chalk binary.
Downloading Chalk
The easiest way to get Chalk is to download a pre-built binary from our release page. It's a self-contained binary with no dependencies to install.
For this tutorial, put it somewhere in your path where you have write access. For example, if you downloaded Chalk to your current directory, you could do:
mkdir -p ~/.local/bin
mv chalk ~/.local/bin
export PATH=$PATH:~/.local/bin
This will put chalk in your path until you log out.
Building From Source
Alternatively, you can build Chalk from source. First, let's checkout the Chalk repository:
git clone https://github.com/crashappsec/chalk.git && cd chalkThe easiest way to build Chalk requires Docker and Docker Compose. This method will produce a Linux binary for your underlying architecture (however, it will not produce a native binary on a Mac). First build the image with:
docker compose build chalkThen build Chalk:
make chalk(or make debug for a debug version).
There should now be a binary chalk in the current directory. Ensure
that it has built properly by running ./chalk (moving it to a Linux
machine first if needed), which should open up the Chalk help
documentation.
Once you have successfully built the chalk binary, move it somewhere into your path where you have write access, as in the download step above.
Source Builds Without Docker
Currently Chalk expects a Posix-compliant environment, and we only develop and test on Linux and MacOS (though other modern Unixes should work fine). We also only support amd64 and arm64.
On those environments, to build without Docker, you must have a C compiler toolchain installed.
The only other dependency is Nim 2.0, which can be installed
via the choosenim installer:
curl https://nim-lang.org/choosenim/init.sh -sSf | shOnce you've done that, you will need to add the toolchain to your path, and then should be able to build Chalk:
export PATH=$PATH:~/.nimble/bin
nimble build
First Run
In this section, we will run chalk to insert a chalk mark on a
sample binary and then examine the results.
Creating A Local Repository
Let's try to give this as much of the flavor of an actual project as possible, by creating a local repository:
mkdir chalktest
cd chalktest
git init
We will populate chalktest with a binary to use for testing, which will need a C compiler. If you don't have one, skip to Copying A Sample Binary.
Creating a Sample Binary
Now, if you have a C compiler, let's add some source code for our
implementation of ls, which will do nothing but call out to the
real ls command. Paste and run the following multi-line shell:
export LSPATH=`which ls`
cat > lswrapper.c << EOF
#include <unistd.h>
int
main(int argc, char *argv[], char *envp[]) {
  execve("${LSPATH}", argv, envp);
  return -1;
}

EOF
printf 'all:\n\tcc -o ls lswrapper.c\n' > Makefile
You can commit our project, if you'd prefer. This will let Chalk display git information in the chalk mark later:
git add *
git commit -am "Chalk demo 1"
Now, assuming you have a C compiler, build and run your ls command:
make
./ls
You should see:
Makefile ls lswrapper.cCopying a Sample Binary
If you're on a Linux system without a C compiler, that's okay, too. For the sake of example, instead of actually running the build, you can pretend we did one by copying over the system binary:
cp `which ls` .Chalk Insertion
Now that we have a reasonable test environment, let's add our first chalk mark:
chalk insert lsWe should see something like the following output:
warn:  Code signing not initialized. Run `chalk setup` to fix.
info:  /home/liming/workspace/chalktest/ls: chalk mark successfully added
info:  /home/liming/.local/chalk/chalk.log: Open (sink conf='default_out')
info:  Full chalk report appended to: ~/.local/chalk/chalk.log
[
  {
    "_OPERATION": "insert",
    "_DATETIME": "2023-09-23T12:42:02.326-04:00",
    "_CHALKS": [
      {
        "PRE_CHALK_HASH": "c96756d855f432872103f6f68aef4fe44ec5c8cb2eab9940f4b7adb10646b90a",
        "CHALK_ID": "64V66C-V36G-TK8D-HJCSHK",
        "PATH_WHEN_CHALKED": "/home/liming/workspace/chalktest/ls",
        "ARTIFACT_TYPE": "ELF",
        "ORIGIN_URI": "local",
        "COMMIT_ID": "5f89bf133d4ca803f2b5ed24ccfe1feff7e11f6b",
        "BRANCH": "main",
        "CHALK_VERSION": "0.1.1",
        "METADATA_ID": "XYJKNQ-DRYK-181P-YS3S7R",
        "_VIRTUAL": false,
        "_CURRENT_HASH": "c96756d855f432872103f6f68aef4fe44ec5c8cb2eab9940f4b7adb10646b90a"
      }
    ],
    "_ENV": {
      "PWD": "/home/liming/workspace/chalktest",
      "XDG_SESSION_TYPE": "wayland",
      "AWS_SECRET_ACCESS_KEY": "<<redact>>",
      "USER": "liming",
      "PATH": "/home/liming/workspace/chalktest/config-tool/dist:/home/liming/workspace/chalktest/bin:/home/liming/workspace/chalktest:/home/liming/.local/bin:/home/liming/.local/bin:/usr/local/sbin:/usr/local/bin:/usr/sbin:/usr/bin:/sbin:/bin:/usr/games:/usr/local/games:/snap/bin:/snap/bin:/usr/local/go/bin:/usr/local/go/bin"
    },
    "_OP_ARGV": [
      "/home/liming/workspace/chalktest/chalk",
      "insert",
      "ls"
    ],
    "_OP_CHALKER_VERSION": "0.1.1",
    "_OP_CHALK_COUNT": 1,
    "_OP_UNMARKED_COUNT": 0
  }
]
By default, chalk will print an abbreviated "summary" Chalk report
to terminal (the JSON blob seen above), and the full Chalk report to
the log file specified at ~/.local/chalk/chalk.log. Both the
contents of the Chalk reports and the locations to which they are sent
are highly customizable, and more information on custom configurations
can be found in our configuration guide.
Compare the default summary Chalk report to the default Chalk report in the log file, which is more verbose. We can view the log by running:
cat ~/.local/chalk/chalk.log
# If you have jq, pretty print w/ cat ~/.local/chalk/chalk.log | jq
The Chalk report is metadata collected about the artifact(s) that have been chalked and the host environment. Here are a few important things to note for now:
-
We've captured basic information about the build environment, including our repo, branch and commit ID. If you pull a repo remotely from GitHub or GitLab, the "ORIGIN_URI" key will give the URL where the repository is hosted instead of
local. -
In addition to the report, we inserted a JSON blob into our executable, the chalk mark. We'll look at it in a minute.
-
The
CHALK_IDkey is unique to the unchalked executable, and is just an encoding of 100 bits of theHASHfield.
If we had left off the file name, Chalk would have attempted to insert chalk marks on all eligible artifacts in the current directory (recursively). This can have adverse effects if performed in a directory with many executables or your home directory, so we advise using a small test directory.
Give it a shot:
chalk insertYou'll see the output is very similar. However, if you created a git
project, the .git directory will have some shell scripts
added to it, and they did not get chalked.
That's because, by default, chalk will skip all dot directories in
your current directory and will refuse to chalk itself.
Chalk Extraction
Let's see what's in the ls binary we just added. We can
have Chalk report on what it inserted into artifacts:
chalk extract lsThis will output a Chalk report on ls:
liming@liming-virtual-machine:~/workspace/chalktest$ ./chalk extract ls
warn:  Code signing not initialized. Run `chalk setup` to fix.
info:  /home/liming/workspace/chalktest/ls: Chalk mark extracted
info:  /home/liming/.local/chalk/chalk.log: Open (sink conf='default_out')
info:  Full chalk report appended to: ~/.local/chalk/chalk.log
[
  {
    "_OPERATION": "extract",
    "_DATETIME": "2023-09-23T12:42:28.654-04:00",
    "_CHALKS": [
      {
        "CHALK_ID": "64V66C-V36G-TK8D-HJCSHK",
        "CHALK_VERSION": "0.1.1",
        "ARTIFACT_TYPE": "ELF",
        "BRANCH": "main",
        "COMMIT_ID": "5f89bf133d4ca803f2b5ed24ccfe1feff7e11f6b",
        "ORIGIN_URI": "local",
        "METADATA_ID": "XYJKNQ-DRYK-181P-YS3S7R",
        "_OP_ARTIFACT_PATH": "/home/liming/workspace/chalktest/ls",
        "_OP_ARTIFACT_TYPE": "ELF",
        "_CURRENT_HASH": "3c8f7e50fe9d640a1409067bb9f3888f5d5aa9aeca02cbb1db4617d47866505d"
      }
    ],
    "_ENV": {
      "PWD": "/home/liming/workspace/chalktest",
      "XDG_SESSION_TYPE": "wayland",
      "AWS_SECRET_ACCESS_KEY": "<<redact>>",
      "USER": "liming",
      "PATH": "/home/liming/workspace/chalktest/config-tool/dist:/home/liming/workspace/chalktest/bin:/home/liming/workspace/chalktest:/home/liming/.local/bin:/home/liming/.local/bin:/usr/local/sbin:/usr/local/bin:/usr/sbin:/usr/bin:/sbin:/bin:/usr/games:/usr/local/games:/snap/bin:/snap/bin:/usr/local/go/bin:/usr/local/go/bin"
    },
    "_OP_ARGV": [
      "/home/liming/workspace/chalktest/chalk",
      "extract",
      "ls"
    ],
    "_OP_CHALKER_VERSION": "0.1.1",
    "_OP_CHALK_COUNT": 1,
    "_OP_UNMARKED_COUNT": 0
  }
]
And the full report is once again in ~/.local/chalk/chalk.log.
Alternatively, to extract all chalk marks from the artifacts in the current directory, we can run:
chalk extractHere, you'll get some warnings on stderr about items in .git not being chalked. By default, Chalk doesn't go into .git directories for insertion, but it does for reporting, just to avoid missing items that are chalked when we're reporting.
Some of the things reported on were found in the actual artifacts. But
much of the reporting is about the operational environment at the
time of the extract. For instance, the _ENV field is an array of the
environment variables present in the host at the time of extraction.
In all contexts, metadata keys starting with an underscore (_)
indicate metadata associated with the current operation we're
performing. Without the underscore, it refers to info from the time of
chalking.
Raw Chalk Marks
If we want to see how the chalk marks look in our software, run the command:
strings ls | grep MAGICYou'll see there's an embedded JSON string in the ls binary, which is the chalk mark:
{
  "MAGIC": "dadfedabbadabbed",
  "CHALK_ID": "64V66C-V36G-TK8D-HJCSHK",
  "CHALK_VERSION": "0.1.1",
  "TIMESTAMP_WHEN_CHALKED": 1695487268282,
  "DATETIME_WHEN_CHALKED": "2023-09-23T12:41:08.124-04:00",
  "ARTIFACT_TYPE": "ELF",
  "BRANCH": "main",
  "CHALK_RAND": "049d278b2137c27d",
  "CODE_OWNERS": "* @viega\n",
  "COMMIT_ID": "5f89bf133d4ca803f2b5ed24ccfe1feff7e11f6b",
  "HASH": "16c3c45462fc89d7fcc84c3749cb0900bdd1052f760ebd7cea1ab3956ad7326f",
  "INJECTOR_COMMIT_ID": "f48980a19298ce27d9584baa1f7dd0fed715ef56",
  "ORIGIN_URI": "local",
  "PLATFORM_WHEN_CHALKED": "GNU/Linux x86_64",
  "METADATA_ID": "WFAEY0-D2S3-WK98-SEAV85"
}
Chalk marks are data segments that are safely inserted into the binary
that don't impact it in any way. Note that the CHALK_ID in the chalk
mark is the same as the one from the insert and extract
operations; the CHALK_ID can be used to correlate chalk marks across
reports.
Sending the Data Somewhere
In this example, there's more metadata in the chalk mark than we'd typically store. Chalk put more data into the mark itself because it didn't send its reports anywhere (except stdout). If we're sending data somewhere, Chalk only needs to insert enough data to look up the artifact in a database.
We've provided a test server that supports a Chalk API endpoint, with an SQLite database in the backend, that you can use. Follow the Run containers to browse Chalk data locally tutorial to download and run the server containers.
The server will run on port 8585 by default, so ensure that this port is not taken by another process before running the server.
The server can be configured to use HTTPS, yet we've left it unconfigured for demo simplicity. Please be mindful of this when testing.
Now that we have our server running, we need to configure Chalk to use that server. We can do this by loading a Chalk configuration file that has an http sink configured. We have a sample that configures Chalk to output to localhost:8585, which you can load via:
chalk load https://chalkdust.io/reporting_server.c4mNow, let's delete existing chalk marks with:
chalk deleteOn the terminal where we run our Chalk command, we see:
info: Post 200 OK (sink conf='output_to_http')Checking the web server logs (via docker logs) should show a successful POST to /report as follows:
INFO: 192.168.1.151:59978 - "POST /report HTTP/1.1" 200 OKViewing chalk data
Let's go ahead and re-chalk our test binary. Run this from the directory where you initially set up a Chalk test:
chalk insert lsOn submission of new chalks, the server logs should once again report:
INFO: 192.168.1.151:33926 - "POST /report HTTP/1.1" 200 OKThose chalk marks have been recorded in our SQLite database. To view the report in the browser, go to http://localhost:8080/reports/content/, and the latest report should be at the bottom of the page.
Alternatively, you can connect to the database with any SQLite shell, and we have an endpoint that will allow you to dump the server's info from the Chalk insertion operation. To see this pretty-printed:
curl http://127.0.0.1:8585/chalks | jq
# Drop the | jq if you don't have it installed, but then it'll be ugly!
curl http://127.0.0.1:8585/chalks
The latest report (if you have more than one) should be at the bottom.
In either case, the latest chalk report should be the insert operation that we have just performed, and the raw report data should look something like this:
{
  "CHALK_ID": "64V66C-V36G-TK8D-HJCSHK",
  "HASH": "16c3c45462fc89d7fcc84c3749cb0900bdd1052f760ebd7cea1ab3956ad7326f",
  "PATH_WHEN_CHALKED": "/home/liming/workspace/chalktest/ls",
  "ARTIFACT_TYPE": "ELF",
  "CODE_OWNERS": "* @viega\n",
  "VCS_DIR_WHEN_CHALKED": "/home/liming/workspace/chalktest",
  "ORIGIN_URI": "local",
  "COMMIT_ID": "5f89bf133d4ca803f2b5ed24ccfe1feff7e11f6b",
  "BRANCH": "main",
  "CHALK_VERSION": "0.1.1",
  "CHALK_RAND": "02fb17e5e1694baf",
  "METADATA_HASH": "f2a1fc1300e98d61674f6a06144125901134f6c34748a8b6b5aa37bf9d911ef0",
  "METADATA_ID": "YAGZR4-R0X6-6P2S-TFD831",
  "_VIRTUAL": false,
  "_OP_ARTIFACT_TYPE": "ELF",
  "_CURRENT_HASH": "c96756d855f432872103f6f68aef4fe44ec5c8cb2eab9940f4b7adb10646b90a",
  "_OPERATION": "insert",
  "_TIMESTAMP": 1695487471882,
  "_DATETIME": "2023-09-23T12:44:31.882-04:00",
  "INJECTOR_ARGV": ["ls"],
  "INJECTOR_COMMIT_ID": "f48980a19298ce27d9584baa1f7dd0fed715ef56",
  "INJECTOR_ENV": {
    "PWD": "/home/liming/workspace/chalktest",
    "XDG_SESSION_TYPE": "wayland",
    "AWS_SECRET_ACCESS_KEY": "<<redact>>",
    "USER": "liming",
    "PATH": "/home/liming/workspace/chalktest/config-tool/dist:/home/liming/workspace/chalktest/bin:/home/liming/workspace/chalktest:/home/liming/.local/bin:/home/liming/.local/bin:/usr/local/sbin:/usr/local/bin:/usr/sbin:/usr/bin:/sbin:/bin:/usr/games:/usr/local/games:/snap/bin:/snap/bin:/usr/local/go/bin:/usr/local/go/bin"
  },
  "INJECTOR_VERSION": "0.1.1",
  "PLATFORM_WHEN_CHALKED": "GNU/Linux x86_64",
  "_ACTION_ID": "8c87b883793695a1",
  "_ARGV": ["ls"],
  "_ENV": {
    "PWD": "/home/liming/workspace/chalktest",
    "XDG_SESSION_TYPE": "wayland",
    "AWS_SECRET_ACCESS_KEY": "<<redact>>",
    "USER": "liming",
    "PATH": "/home/liming/workspace/chalktest/config-tool/dist:/home/liming/workspace/chalktest/bin:/home/liming/workspace/chalktest:/home/liming/.local/bin:/home/liming/.local/bin:/usr/local/sbin:/usr/local/bin:/usr/sbin:/usr/bin:/sbin:/bin:/usr/games:/usr/local/games:/snap/bin:/snap/bin:/usr/local/go/bin:/usr/local/go/bin"
  },
  "_OP_ARGV": ["/home/liming/workspace/chalktest/chalk", "insert", "ls"],
  "_OP_CHALKER_COMMIT_ID": "f48980a19298ce27d9584baa1f7dd0fed715ef56",
  "_OP_CHALKER_VERSION": "0.1.1",
  "_OP_CMD_FLAGS": [],
  "_OP_EXE_NAME": "chalk",
  "_OP_EXE_PATH": "/home/liming/workspace/chalktest",
  "_OP_HOSTINFO": "#32~22.04.1-Ubuntu SMP PREEMPT_DYNAMIC Fri Aug 18 10:40:13 UTC 2",
  "_OP_HOSTNAME": "liming-virtual-machine",
  "_OP_NODENAME": "liming-virtual-machine",
  "_OP_PLATFORM": "GNU/Linux x86_64",
  "_OP_SEARCH_PATH": ["ls"],
  "_OP_CHALK_COUNT": 1,
  "_OP_UNMARKED_COUNT": 0
}
Basic Configurations
Let's examine the configuration file we have loaded for the server output.
First, we can write the configuration to a file that can view it:
chalk dump testconfig.c4mYou should see in the output file testconfig.c4m:
use reporting_server from "https://chalkdust.io"Next, run:
chalk dump cacheYou should see in terminal:
 ┌┈┈┈┈┈┈┈┈┈┈┈┈┈┈┈┈┈┈┈┈┈┈┈┈┈┈┈┈┈┈┈┈┈┈┈┈┈┈┈┈┈┈┈┈┈┈┈┈┈┈┈┈┈┈┈┈┈┈┈┈┈┈┈┈┈┈┈┈┈┈┈┈┈┈┈┈┐
 ┊  func validate_url(url) {                                                  ┊
 ┊    result := ""                                                            ┊
 ┊                                                                            ┊
 ┊    if (not url.starts_with("http://")) and (not url.starts_                ┊
 ┊  with("https://")) {                                                       ┊
 ┊      return "Only http / https URLs are supported"                         ┊
 ┊    }                                                                       ┊
 ┊  }                                                                         ┊
 ┊                                                                            ┊
 ┊  func get_local_url() {                                                    ┊
 ┊    return "http://" + external_ip() + ":8585/report"                       ┊
 ┊  }                                                                         ┊
 ┊                                                                            ┊
 ┊  parameter sink_config.output_to_http.uri {                                ┊
 ┊    shortdoc:  "URL for reporting server"                                   ┊
 ┊    doc: """                                                                ┊
 ┊  A config for sending reports to a custom implementation of the test       ┊
 ┊  reporting server.                                                         ┊
 ┊                                                                            ┊
 ┊  Run the server via:                                                       ┊
 ┊                                                                            ┊
 ┊  ```                                                                       ┊
 ┊  docker run -w /db -v $HOME/.local/c0/:/db -p 8585:8585                    ┊
 ┊  --restart=unless-stopped ghcr.io/crashappsec/chalk-test-server            ┊
 ┊  ```                                                                       ┊
 ┊  """                                                                       ┊
 ┊    validator: func validate_url(string) -> string                          ┊
 ┊    default: func get_local_url() -> string                                 ┊
 ┊  }                                                                         ┊
 ┊                                                                            ┊
 ┊  sink_config output_to_http {                                              ┊
 ┊    enabled: true                                                           ┊
 ┊    sink:    "post"                                                         ┊
 ┊                                                                            ┊
 ┊    # The URI should get filled in automatically.                           ┊
 ┊  }                                                                         ┊
 ┊                                                                            ┊
 ┊  subscribe("report", "output_to_http")                                     ┊
 ┊                                                                            ┊
 └┈┈┈┈┈┈┈┈┈┈┈┈┈┈┈┈┈┈┈┈┈┈┈┈┈┈┈┈┈┈┈┈┈┈┈┈┈┈┈┈┈┈┈┈┈┈┈┈┈┈┈┈┈┈┈┈┈┈┈┈┈┈┈┈┈┈┈┈┈┈┈┈┈┈┈┈┘
The configuration language is called con4m.
In this case, the http config does three things:
- It adds a 'sink configuration', specifying where to post (e.g., to a web endpoint, an S3 bucket, or a rotating log file).
- It subscribes this configuration to the primary report produced by the command (the report that has been going to our log file).
- It removes the builtin subscription that causes the default report to go to the log file (note that this differs from the terminal summary report, which should still display).
If we want to make changes to the configuration (for instance, you
might change 'localhost' to a valid host name so you can push to your
server from other machine) we can use Chalk's load command, passing
it the file name of our edited config. That will test the config and
show us what it installed (or throw an error if the config is not
valid).
When in doubt, we can always return Chalk to its default configuration. Let's try that now by running:
chalk load defaultYou might notice that, when chalk load ran above, the web server
reported a POST action. This is because the chalk load command is
implemented by a Chalk binary chalking itself, and the previous
configuration (reporting_server.c4m) had the http sink still enabled for
reporting. Note that any further Chalk operations, now that the
default configuration is loaded, will not show up on the server, as
the default configuration does not have the http sink enabled.
If we want to validate that we have the correct
configuration loaded, we can run chalk dump again, but this time
without specifying a file name (which will just print to stdout):
chalk dumpYou should see:
# The default config is empty. Please see chalk documentation for examples.Let's reload the http config so that we can send chalks to the server again, but from our local file (especially if you changed the configuration at all):
chalk load testconfig.c4mChalking a Container
We can use Chalk to mark container images by instructing Chalk to wrap our Docker commands. Let's write a shell script to use as a Docker container to demonstrate this capability.
We'll have it wait 10 seconds before outputting either the arguments passed to it or else "Hello, world", and then exit:
cat > hi.sh << EOF
#!/bin/sh
sleep 10
echo ${@:-Hello, world}
EOF
chmod +x hi.sh
Let's run it and make sure it works:
./hi.shAfter 10 seconds, you should see "Hello world", as expected.
We want at least a short pause so that the container has time to start up and report for us. If a container entrypoint exits, it's like an entire machine exiting, and our reporting can be stopped before it's finished.
A second would be enough to ensure that we report, but we'll go a little longer just for the sake of demoing some other functions later.
Now we need a Dockerfile for our project:
cat > Dockerfile << EOF
FROM alpine
COPY hi.sh /hi.sh
ENTRYPOINT ["/hi.sh"]
EOF
Now, we could build this by wrapping it with Chalk. We just put the
word chalk in front of the Docker command we'd normally use.
The problem with that is people then have to remember to add chalk
in front of all their Docker operations. We can easily make the
chalking process automatic if we just tell chalk that, if it doesn't
see any other chalk command, it should impersonate Docker. Then we
can add either a user alias or a system-wide alias, and Chalk will do
the right thing when it's invoked.
Impersonation is set up simply by telling your Chalk binary that its
default Chalk command should be docker. When you run chalk docker,
Chalk considers docker one of its own commands, and when it runs, it
both runs the Docker operation you wanted, and does its data
collection and marking when appropriate.
Let's load a variant of the above demo config that still reports over http, but has two other changes:
- It sets the default command to
docker - It removes the summary report.
chalk load https://chalkdust.io/compliance_docker.c4mIf you want to edit the contents to change the server address from localhost to a real IP, you can go ahead and do so.
Chalk is smart about masquerading as Docker — so long as the real Docker appears anywhere in your path, Chalk will find it and run it.
This means that if you name your Chalk binary docker and stick it higher
up in the default path than the real Docker, everything will
just work and you do not even have to worry about an
alias. Alternatively, you can take Docker out of your path completely and
configure Chalk to tell it where Docker lives.
But for this demo, let's just do the alias:
alias docker=chalkAssuming you have Docker installed and configured, you can now run:
docker build -t chalk-demo:latest .You should be able to see that, even though there's no more summary report being printed, the full report of what happened still went to our server. That report will indicate the container was successfully chalked:
INFO: 192.168.1.151:33926 - "POST /report HTTP/1.1" 200 OKBut from the command line, what you see will look similar to how it would if you hadn't used Chalk:
[+] Building 0.0s (7/7) FINISHED                                                                                         docker:default
 => [internal] load build definition from chalk-tsZTehBK-file.tmp                                                                  0.0s
 => => transferring dockerfile: 363B                                                                                               0.0s
 => [internal] load .dockerignore                                                                                                  0.0s
 => => transferring context: 130B                                                                                                  0.0s
 => [internal] load metadata for docker.io/library/alpine:latest                                                                   0.0s
 => [internal] load build context                                                                                                  0.0s
 => => transferring context: 254B                                                                                                  0.0s
 => CACHED [1/2] FROM docker.io/library/alpine                                                                                     0.0s
 => [2/2] COPY chalk-DIkeL7rO-file.tmp  /chalk.json                                                                                0.0s
 => exporting to image                                                                                                             0.0s
 => => exporting layers                                                                                                            0.0s
 => => writing image sha256:9f23f7871afd26d36e307a6e742225dfeec6b2857b36c6596565f1496ba0238a                                       0.0s
 => => naming to docker.io/library/chalk-demo:latest                                                                               0.0s
The only slight difference is that, after the user's Dockerfile commands, we copied the chalk mark into the container, which does show up in the above output.
If we inspect the image we produced, we can see the chalk mark that was added:
docker inspect chalk-demo:latestYou'll also notice we automatically added several labels to the container to help make it easy to look at any container in production and tie it back to how it was built:
    "Labels": {
                "run.crashoverride.author": "Theofilos Petsios <theofilos@crashoverride.com> 1703872981 +0200",
                "run.crashoverride.branch": "main",
                "run.crashoverride.commit-id": "a5570d8814567ab34529336b900ada8052c51594",
                "run.crashoverride.commit-signed": "true",
                "run.crashoverride.committer": "GitHub <noreply@github.com> 1703872981 -0500",
                "run.crashoverride.date-authored": "Fri Dec 29 13:03:01 2023 +0200",
                "run.crashoverride.date-committed": "Fri Dec 29 13:03:01 2023 -0500",
                "run.crashoverride.origin-uri": "https://github.com/crashappsec/chalk.git"
    }
Again, the origin-uri will generally be a URL if you cloned or pulled the repo. The other two fields tell you exactly which version of the code you're running.
It's also easy to get Chalk to automatically sign the chalk mark and container when you build it. See our compliance guide for more information.
Chalk only monitors a subset of Docker commands, but when wrapping Docker, it will pass through all Docker commands even if it doesn't do any of its own processing on them. If Chalk encounters an error while attempting to wrap Docker, it will then execute the underlying Docker command without Chalk so that this doesn't break any pre-existing pipelines.
Run-time reporting
⚠️ This section will not work as-is on OS X, since Docker is running a different OS from your chalk binary; dealing with that is beyond the scope of this tutorial.
So far, we've focused on the ease of adding chalk marks. But Chalk's goal is to bridge code managed in repositories to what's running in production. Let's change our container to use Chalk to launch our workload and report on the launch.
For that, let's load another configuration which is the same as our previous one, except that it also "wraps" the container's entrypoint.
That means that when your container builds, Chalk will set up the
container so that the entry point you gave it is still PID 1, but
will also spawn a chalk process that reports metadata about the
operational environment whenever the container starts up.
The configuration for where the report goes is taken from your Chalk binary. Chalk will simply copy itself into the container and have that binary do the reporting.
🤖 Chalk does not need to be reconfigured to go into the container. It gets run using the
chalk execcommand, which tells it the context it needs. It's possible to change how you report based on the Chalk command used; see the Chalk I/O configuration guide for more info.
Let's apply this config automatically with:
chalk load https://chalkdust.io/wrap_entrypoints.c4mWe simply need to rebuild the container to cause Chalk to wrap:
docker build -t chalk-demo:latest .Now, let's finally run the container. If you're running everything locally, Docker does require that we add a flag explicitly allowing us to connect back to localhost for this demo.
docker run --rm -t --network="host" chalk-demo:latestWe get our 'hello world':
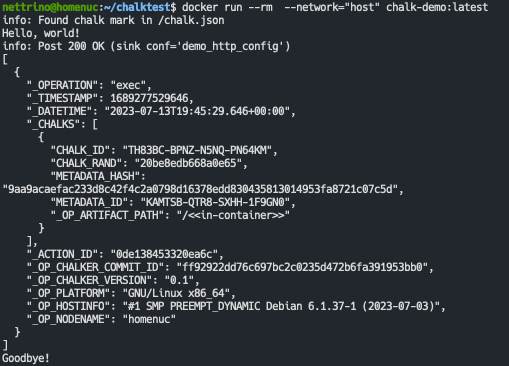 { loading=lazy }
Feel free to run it again to add some arguments and see that they get
passed all the way through to the hi.sh script.
You should see that every time the container starts, the server gets a report. Let's see what it gives us. We have a second endpoint in the demo server to make it easy to see reported executions:
curl http://127.0.0.1:8585/execs
# for pretty json output if you have jq installed, run `curl http://127.0.0.1:8585/execs | jq`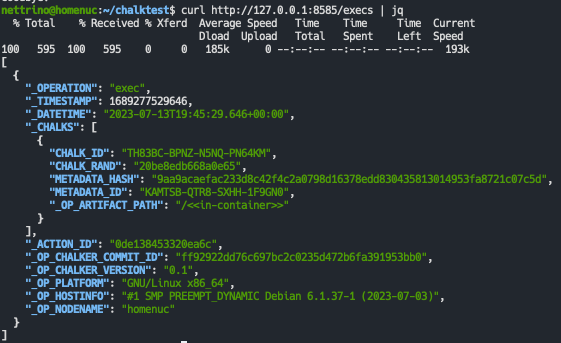 { loading=lazy }
You can see that, in addition to artifact information, there is also
information about the operating environment, including the container
ID (the _INSTANCE_ID key). We can also see a bunch of data about the
running executable prefixed with _PROCESS.
You can also configure Chalk to periodically report back on environment information. See our heartbeat guide for further details.