Create software security supply chain compliance reports automatically
Use Chalk to fulfill pesky security supply chain compliance requests, and tick pesky compliance checkboxes fast and easy
Summary
The US Government, several large corporations, and the Linux foundation with their SBOM Everywhere initiative are all driving the industry to adopt a series of requirements around "software supply chain security," including:
-
SBOMs (Software Bills of Materials) to show what 3rd party components are in the code.
-
Code provenance data that allows you to tie software in the field to the code commit where it originated from and the build process that created it.
-
Digital signatures on the above.
This information is complex and tedious to generate and manage, but we can easily automate this with Chalk™.
This how-to uses Chalk to automate supply chain compliance in three steps:
-
Run containers to receive and browse compliance data.
-
Configure Chalk to generate SBOMs, provenance data, and digital signatures.
-
Build software using Docker with compliance data built-in.
As a big bonus, with no extra effort, you can be SLSA level 2 compliant before people start officially requiring SLSA level 1 compliance.
Steps
Before you start
You should have a working installation of Chalk. The easiest way to get Chalk is to download a pre-built binary from our release page. It's a self-contained binary with no dependencies to install.
Additionally, you will need docker, as the reporting web service will be installed by running two docker containers: one for collecting logs and the other to give us a web frontend to browse them.
Step 1: Run containers to browse Chalk data
Any digital signatures will generally be inserted into the artifact, as well as included in the container manifest for docker. Collected SBOMs can also be directly inserted if you like, but as the SBOM reports can be very large, we recommend capturing the data at build-time and sending it off to the Chalk API server.
For this guide, we will be running the server locally. If you do not already have it set up, follow the instructions to do so at How-to run containers to browse Chalk data locally.
Step 2: Configure Chalk to generate SBOMs, collect code provenance data, and generate digital signatures
Chalk is designed so that you can easily pre-configure it for the behavior you want, and then run a single binary with no arguments. It also allows you to load and tweak configurations without having to manually edit a configuration file.
Assuming you've downloaded Chalk into your working directory, you can load the compliance configuration file by running:
chalk load https://chalkdust.io/compliance_docker.c4mThis
chalkbinary can be used without Docker; it just makesdockerthe 'default' mode, which means that if it doesn't recognize a Chalk command, it will pass off the command todockerto run. If you don't want that functionality, replace the URL above withhttps://chalkdust.io/basic_compliance.c4m.
Note that the above load command will add compliance_docker.c4m as a component to the existing configuration in the Chalk binary. If you have already loaded a non-default configuration, and would like the compliance configuration to replace the existing configuration instead of being appended, you can run:
chalk load --replace https://chalkdust.io/compliance_docker.c4mBy default, Chalk is already collecting provenance information by examining your project's build environment, including the .git directory and any common CI/CD environment variables. Loading either of the above profiles will add two key things to the default behavior:
-
It will enable the collection of SBOMS (off by default because on large projects, this can add a small delay to the build)
-
It will enable sending the compliance info we collect back to the API server we set up in step one.
During the load operation, you will be prompted to enter the URL for the server we set up in the previous step. The default will use your current IP address in the URL. You should see the following output:
liming@system76-pc:~/workspace/chalk$ chalk load https://chalkdust.io/compliance_docker.c4m
info:  Attempting to load module from: https://chalkdust.io/compliance_docker.c4m
                                 CONFIGURING COMPONENT: HTTPS://CHALKDUST.IO/COMPLIANCE_DOCKER

Configuring: sink_config.output_to_http.uri -- URL for reporting server

A config for sending reports to a custom implementation of the test reporting server.

Run the server via:

docker run -w /db -v $HOME/.local/c0/:/db -p 8585:8585 --restart=unless-stopped ghcr.io/crashappsec/chalk-test-server


Default is: http://192.168.1.218:8585/report
Press [enter] to accept default, or enter a value:
Generally, the default should work fine for the local testing server. Note that there is no TLS for this, which we do not recommend for production.
If you wish to additionally embed the full SBOM into artifacts, you can. This makes it easy for anyone looking for SBOMs to know that they are looking at the exact right version.
If you'd like to add this capability, then run:
chalk load https://chalkdust.io/embed_sboms.c4mAs above, this will add to your current configuration. You can always check what configuration has been loaded by running:
chalk dumpAfter loading compliance_docker and embed_sboms onto a default binary, we expect the dump output to look like this:
liming@liming-virtual-machine:~/workspace/chalk$ chalk dump

use compliance_docker from "https://chalkdust.io"
use embed_sboms from "https://chalkdust.io"
If you need to start over, you can always add the --replace flag when running a load, which will wipe away your old configuration and replace it with the incoming configuration. If you need to return to the default configuration, you can do so by running:
chalk load defaultNote that loading the default configuration will always replace the current configuration, so the --replace flag is not needed.
Step 2b: Turn on digital signing
We still need to turn on digital signing, which is off by default. We will need to generate signing keys.
To configure your binary to sign, simply run:
chalk setupYou'll get a prompt to connect an account for authentication to be able to use Crash Override's secret service for Chalk:

You can connect using either the link or the QR code. The account is totally free, and is only used to keep us from being an easy Denial-of-Service target.
Once you have successfully connected an account, you'll get a series of success messages. You should also see two new files in your current working directory: chalk.key and chalk.pub. If for any reason you need to rerun chalk setup, remove these two files before doing so.
At this point, your Chalk binary will have re-written itself to contain most of what it needs to sign, except for a secret that it requests dynamically from our secret service.
Step 3: Build software
Now that the binary is configured, you may want to move the chalk binary to a system directory that's in your PATH. If you're running Docker, we recommend adding a global alias so that Chalk always runs. See the how-to for docker deployment for more details.
How you run Chalk depends on whether you're building via docker or not:
-
With docker: You "wrap" your
dockercommands by putting the wordchalkin front of them, ex:chalk docker build [...] -
Without docker : You simply invoke
chalk insertin your build pipeline. It defaults to inserting marks into artifacts in the current working directory.
Step 3a: Docker
With docker wrapping enabled, your build operations will add a file (the "chalk mark") into the container, which will contain the provenance info and other metadata, and any SBOMs generated. When you push containers to a registry, Chalk will auto-sign the containers (including the entire chalk mark).
For instance, let's pick an off-the-shelf project and treat it like we're building part of it in a build pipeline. We'll use a sample Docker project called wordsmith.
We'll also need access to a Docker registry that can push our images. If you have access to a registry where you have push permissions, ensure that you have logged into the registry before continuing, and use that registry name in the following examples.
If you don't have access or appropriate permissions to any registry, you can set up a local registry by following the instructions here. In the following examples we will be using a local registry at localhost:5000.
To clone and build the wordsmith project, run:
git clone https://github.com/dockersamples/wordsmith
cd wordsmith/api
chalk docker build -t localhost:5000/wordsmith:latest . --push
You'll see Docker run normally (it'll take a minute or so). If your permissions are correct, it will also push to the registry. Once Docker is finished, you'll see some summary info from Chalk on your command line in JSON format, including the contents of the Dockerfile used.
The terminal report (displayed after the Docker ouput) should look like this:
[
  {
    "_OPERATION": "build",
    "_DATETIME": "2023-10-30T12:35:44.335-04:00",
    "_CHALKS": [
      {
        "CHALK_ID": "GWWH8K-W4TW-GEVV-18JMKT",
        "DOCKERFILE_PATH": "/home/liming/workspace/wordsmith/api/Dockerfile",
        "DOCKER_FILE": "# Build stage\nFROM --platform=${BUILDPLATFORM} maven:3-amazoncorretto-20 as build\nWORKDIR /usr/local/app\nCOPY pom.xml .\nRUN mvn verify -DskipTests --fail-never\nCOPY src ./src\nRUN mvn verify\n\n# Run stage\nFROM --platform=${TARGETPLATFORM} amazoncorretto:20\nWORKDIR /usr/local/app\nCOPY --from=build /usr/local/app/target .\nENTRYPOINT [\"java\", \"-Xmx8m\", \"-Xms8m\", \"-jar\", \"/usr/local/app/words.jar\"]\nEXPOSE 8080\n",
        "DOCKER_LABELS": {},
        "DOCKER_TAGS": [
          "localhost:5000/wordsmith:latest"
        ],
    [...]
To check that the container pushed has been successfully Chalked, we can run:
chalk extract localhost:5000/wordsmith:latestThe terminal report for the extract operation should look like this:
[
  {
    "_OPERATION": "extract",
    "_DATETIME": "2023-10-30T12:36:32.760-04:00",
    "_CHALKS": [
      {
        "_OP_ARTIFACT_TYPE": "Docker Image",
        "_IMAGE_ID": "08b70fda0986feecf73e8c86b1156c5470abd23384268256c5fd88deed7f3aa3",
        "_REPO_TAGS": [
          "localhost:5000/wordsmith:latest"
        ],
        "_REPO_DIGESTS": {
          "localhost:5000/wordsmith": "75aaf0ed73fd8d7d90f826d712eff6a74573bdb0ed2c1f41b57c478e16c25472"
        },
        "_CURRENT_HASH": "08b70fda0986feecf73e8c86b1156c5470abd23384268256c5fd88deed7f3aa3",
        "CHALK_ID": "GWWH8K-W4TW-GEVV-18JMKT",
        "CHALK_VERSION": "0.2.2",
        "METADATA_ID": "DZDT7N-4RP1-KGXM-7K27WY"
      }
    ],
    [...]
In particular, note that the CHALK_ID for the build and extract operations are the same -- this ID is how we will track the container. Go to the SQLite database and check the Chalk mark with the associated CHALK_ID. We can do this by running the following query under the chalks tab:
SELECT *
FROM "chalks"
WHERE chalk_id == "GWWH8K-W4TW-GEVV-18JMKT"
We should see something like this:

Checking the raw Chalk mark, we can see the SBOM data has been embedded:
{
  "CHALK_ID": "ZHX3PS-MKMR-Y0J8-A6RW7Y",
  [...]
    "SBOM":
    {
      "syft":
        {
          "$schema": "http://cyclonedx.org/schema/bom-1.4.schema.json",
          "bomFormat": "CycloneDX",
          "specVersion": "1.4",
          "serialNumber": "urn:uuid:bbcecc86-342e-4550-a6ce-6f7ac359d8da",
  [...]
If the image we have built here is run as a container, the Chalk mark will be included in a chalk.json file in the root of the container file system. The chalk.json file in the container should also have the SBOM data embedded if the embed_sboms.c4m configuration component has been loaded.
If there's ever any condition that Chalk cannot handle (e.g., if you move to a future Docker upgrade without updating Chalk, then use features that chalk doesn't understand), Chalk will always make sure the original docker command gets run if the wrapped command does not exit successfully. This ensures that adding Chalk to a build pipeline will not break any existing workflows.
Step 3b: When Not Using Docker
When you invoke Chalk as configured, it searches your working directory for artifacts, collects environmental data, and then injects a "chalk mark" into any artifacts it finds.
Chalk, therefore, should run after any builds are done, but it should still have access to the repository you're building from. If you copy out artifacts, then instead of letting Chalk use the working directory as the build context, you can supply a list of locations on the command line.
For example, let's make a copy of the ls binary into tmp called ls-test and Chalk it:
cp /usr/bin/ls /tmp/ls-test
chalk insert /tmp/ls-test
This will insert a Chalk mark into the ls-test binary, with environmental data (and git data, if available) taken from the /tmp directory, instead of the current working directory. You should see a terminal summary report like this:
[
  {
    "_OPERATION": "insert",
    "_DATETIME": "2023-10-30T17:17:55.287-04:00",
    "_CHALKS": [
      {
        "PRE_CHALK_HASH": "8696974df4fc39af88ee23e307139afc533064f976da82172de823c3ad66f444",
        "CHALK_ID": "CHJKGD-K569-K30D-SR60R3",
        "PATH_WHEN_CHALKED": "/tmp/ls-test",
        "ARTIFACT_TYPE": "ELF",
        "CHALK_VERSION": "0.2.2",
        "METADATA_ID": "2NQ40N-7T08-05MJ-30EXKZ",
        "SIGNATURE": "MEYCIQCjXwUttf2Lpx7PYx5QsFSCXqrpY4+1Q6vUWWz7ZEMl0QIhAN2whDM4WgzzrNcSVwWh7mfTcVtjgnumyxAzXkWbMp3J",
        "_VIRTUAL": false,
        "_CURRENT_HASH": "8696974df4fc39af88ee23e307139afc533064f976da82172de823c3ad66f444"
      }
    ],
    [...]
To check that the Chalk mark has been correctly added, we can run:
chalk extract /tmp/ls-testThe terminal report for the extract operation should look like this:
[
{
"_OPERATION": "extract",
"_DATETIME": "2023-10-30T17:19:20.628-04:00",
"_CHALKS": [
{
"CHALK_ID": "CHJKGD-K569-K30D-SR60R3",
"CHALK_VERSION": "0.2.2",
"ARTIFACT_TYPE": "ELF",
"METADATA_ID": "2NQ40N-7T08-05MJ-30EXKZ",
"_OP_ARTIFACT_PATH": "/tmp/ls-test",
"_OP_ARTIFACT_TYPE": "ELF",
"_CURRENT_HASH": "7cf6bd9e964e19e06f77fff30b8a088fbde7ccbfc94b9500c09772e175613def"
}
],
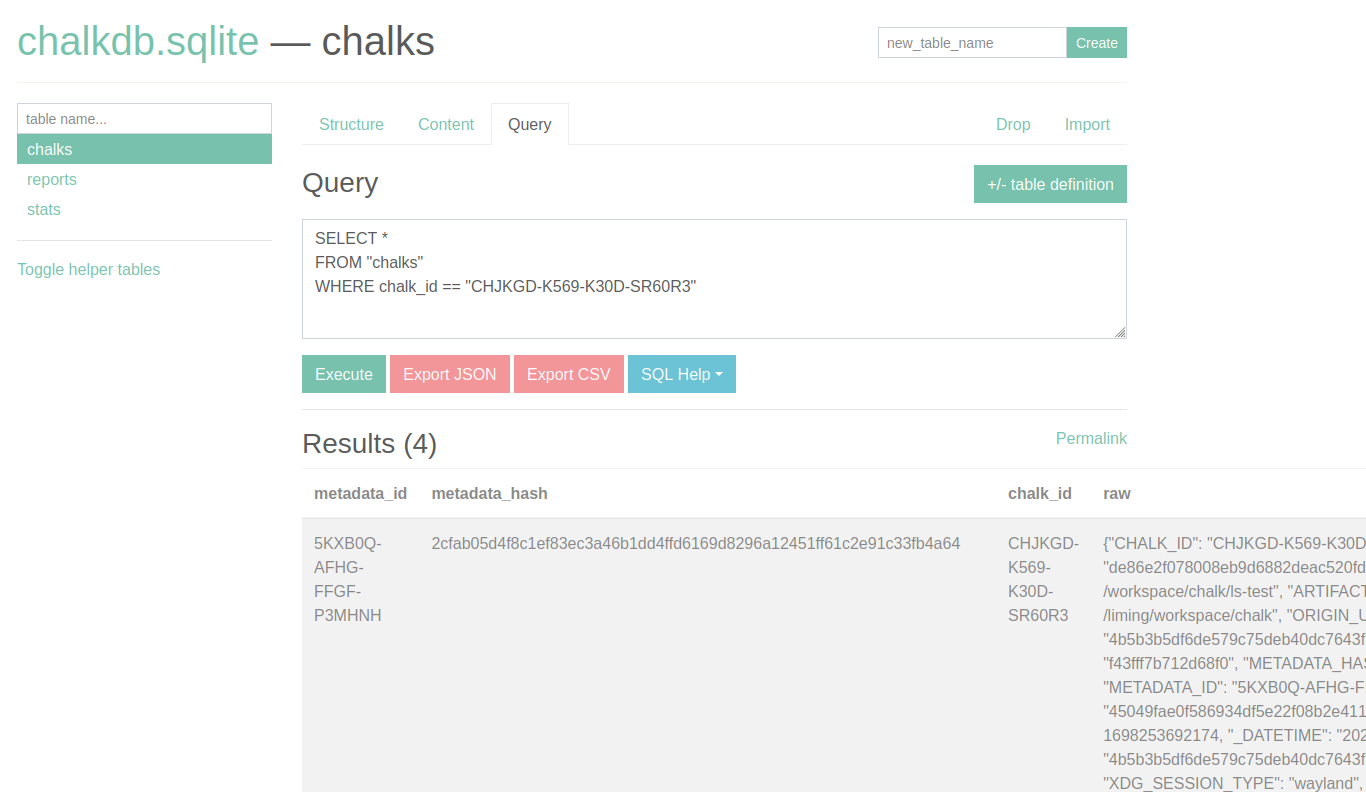
[...]Similarly with the Docker example above, we can use the CHALK_ID here to look up the full Chalk mark on the server. We can do this by running the following query under the chalks tab:
SELECT *
FROM "chalks"
WHERE chalk_id == "CHJKGD-K569-K30D-SR60R3"
We should see something like this:
Checking the raw Chalk mark will show the full SBOM data.
The Chalk mark is always stored as a JSON blob, but how it's embedded into an artifact varies based on the type of file.
For example, with ELF executables as produced by C, C++, Go, Rust, etc, Chalk creates a new "section" in the binary; it doesn't change what your program does in any way. For scripting content such as .py files, Chalk will add a comment to the bottom of the file containing the Chalk mark. JAR files (and other artifacts based on the ZIP format) are handled similarly to container images.
There are marking approaches for a few other formats, with more to come.
Chalk extraction and validation
If you chose to add full SBOMs to the Chalk mark by adding the embed_sboms.c4m component above, people don't need your database to get all the compliance information.
Even if you didn't, the signing and provenance information will still be embedded in non-executable data within your artifact. Any chalk executable can then extract the Chalk mark and verify everything by using the extract command.
By default, chalk extract will report on anything it finds under your current working directory and will extract the Chalk marks from any artifacts that it finds that weren't containerized. To extract Chalk marks from all images, we can run chalk extract images; similarly, chalk extract containers will extract Chalk marks from all running containers. (Warning: running extract on all images or containers will take a long time, and is not generally recommended.)
To extract on a specific artifact, you can pass a list of locations (or image/container names) into the extract command as demonstrated above.
The extract operation will pull all the metadata that Chalk saved during the insert or docker build operations and log it, showing only a short summary report to your console.
If the signature validation fails, then you'll get an obvious error! If anyone tampers with a mark or changes a file after the Chalking, it is clear in the output.
Background information
Below is a bit more information on supply chain security and the emerging compliance environment around it, as well as some details on how Chalk addresses some of these things under the hood.
Supply chain security and the US government
In May 2021, President Biden issued Executive Order 14028 to enhance cyber security and the integrity of the software supply chain. NIST (the National Institute of Standards and Technology) published Security Measures for “EO-Critical Software” Use Under Executive Order (EO) on July 2021 in response.
SBOMs
Many organizations are already demanding SBOMs (software bills-of-material) to understand open-source components in what they consume, ideally so that they can use it to monitor downstream vulnerabilities in the software they use, even though the industry isn't good at operationalizing anything around this.
Unfortunately, there are two competing file formats for SBOM, SPDX and CycloneDX. Furthermore, there are many, many different SBOM-related tools, many of which only work in a subset of environments (e.g., tools that only produce SBOMs for specific package environments like npm). This complexity doesn't make anyone's lives easier outside the security community.
Chalk has a pluggable ability to run third-party tools. For SBOMs, the only tool currently pre-configured is the open-source Syft (which will automatically be installed when needed if it isn't found locally).
We've found it to be a good general-purpose tool, but we may add more out-of-the-box SBOM integrations if contributed by the community; the general tool facility does allow you to generate multiple SBOMs for the same project, so we will likely provide multiple tools by default when turned on.
Code provenance
The desire to understand provenance in software builds is driven mostly by the government and large Fortune 500 companies that have found that, historically, many of their worst security incidents came because of a downstream vendor's code, and have noticed that attackers in those environments often take advantage of access to build environments to subtly trojan software.
Therefore, mature security programs in places with an acute awareness of risk very much want the ability to monitor the integrity of builds throughout their supply chain. Barring that, they are looking to get as much information as possible, or at least some assurances of build practices.
In spending a great deal of time watching real people work, we have found that most companies not in the Fortune 500 have much higher-priority problems than improving visibility into their supply chain.
However, we have noticed many companies have an INTERNAL provenance problem, where they lose significant time because they don't have a good way to handle the visibility of their own code. Operational teams often need to spend time asking around to answer questions like, "There's a service that is suddenly running up our AWS bill. Who owns it?" Then, it can take more time for developers to extract info from the ops team about what version was deployed and what else was going on in the environment.
Chalk was originally built for those internal use cases, getting people the data they need to automate work that graphs out the relationships in their software. However, our approach happens to give other companies exactly what they're looking for.
Digital signatures
For companies that care about provenance data, they would definitely prefer some level of assurance that they're looking at the RIGHT data, untampered with by an attacker -- no deletions, additions, or changes from the time it was signed.
Traditional digital signatures for software aren't particularly helpful for companies with these problems. They can easily ensure they are using the right software via direct relationships with the vendor, all without signatures.
It's the metadata they're looking for on software components and the build process where signatures gain utility. If there's no signature, there's no bar for an attacker to simply forge information on the build process, making it easy to cover their tracks.
Signing provides a bar, for sure. But to keep things scalable and affordable, few developers would put a human in the loop to review and sign everything. And even if they do, the attacker could still get those people to sign off on changes the attacker made himself.
So, while automatic signing is susceptible to the attacker taking over the signing infrastructure, such an attack takes much more work, raising the bar significantly.
This community has put together a few standards on the logistics of signing under the umbrella of the "Sigstore" project at the Linux Foundation. Chalk uses their "In-Toto" standard internally.
The signature validation works automatically by adding the PUBLIC signing key to the Chalk mark. For extra assurance, some users might want to compare the embedded public key against a copy you provide out-of-band.
That's why, when you ran chalk setup, Chalk output two files to disk:
- chalk.pub The public key you can give people out of band.
- chalk.key The ENCRYPTED private key (just in case you want to load the same key into a future Chalk binary).
When you run chalk setup we generate a keypair for you and encrypt
the private key. The key is encrypted with a randomly generated
password (128 random bits encoded), and that password is escrowed with
our secret service. The Chalk binary receives a token that it can use
to recover the secret when it needs to sign.
The token and the private key are embedded into the Chalk binary, so you won't have to keep a separate data file around to keep things working. Your Chalk binary can move from machine to machine with no problems.
Basically, Chalk adds a chalk mark to itself, similar to how it will add one to containers or other artifacts. Chalk marks are, essentially, JSON data blobs added to software (or images containing software) in a way that is totally benign.
Currently, when signing, we're using the aforementioned In-Toto
standard. We are also leveraging the open-source cosign tool, which
is also part of the Linux Foundation's SigStore project. We will
probably eventually incorporate the functionality directly into Chalk,
but for now, when Chalk cannot find cosign and you need it to sign or
validate, it will try to install the official binary: first via go get, and, if that fails, via direct download.
SLSA
Part of the security industry has been hard at work putting together a standardized framework to capture all of the above requirements, SLSA ("Supply-chain Levels for Software Artifacts").
The draft version was far-reaching and complicated, which would have hindered adoption. Plus, due to much better marketing, security teams started focusing on SBOMs. So, SLSA has simplified dramatically.
With the new "1.0" standard, the important parts of SLSA contain a few high-level asks. Nonetheless, even those high-level asks can be very difficult for people to address, which the framework developers did recognize. Thankfully, they made the wise decision to frame their asks in terms of "Security Levels":
-
Level 0 means you're not doing anything to address provenance risks.
-
Level 1 compliance means that you'll provide people provenance information about how you built the package. This now no longer explicitly asks for SBOMs, but the need for component information is implicit because they're asking for details on the build process.
-
Level 2 compliance primarily adds the requirement for the provenance information to be output at the end of your build process along with a digital signature of that information, which can be fully automated.
-
Level 3 compliance requires more hardening still; it's currently more ill-defined, but the gist is that they are hoping people will invest in demonstrating that their build processes are 'tamper-evident'.
That goes back to our discussion on automated digital signatures above. The SLSA designers realize that, in most domains, asking for Level 3 compliance is unreasonable, at least at the moment.
So they're often not likely to be able to detect tampering with software during the build process (which is the real goal of Level 3), but they feel like being able to detect tampering AFTER the build process should be a short-term realistic goal, which automated signing does well enough (Level 2).
But they do recognize that there hasn't been good tooling around any of this yet, and that in many places, they'll be lucky to get the basic info without the extra work of signatures.
But, in good news for everyone, Chalk gives you everything you need to easily meet the Level 2 requirement for signed-provenance generated by a hosted build platform.
A List of well-known software supply chain attacks
Lodash
Lodash is a popular NPM library that was, in March 2021, found to have a prototype pollution vulnerability. It was the most depended on package in NPM meaning almost all applications built in Node.js were affected.
Prototype Pollution in lodash - GitHub
Netbeans
In 2020, it was reported that a tool called the Octopus scanner was searching GitHub and injecting malware into projects that were using the popular Java development framework Netbeans and then serving up malware to all applications built from those code repos.
https://duo.com/decipher/malware-infects-netbeans-projects-in-software-supply-chain-attack - Duo Research Labs
Log4j and Log4Shell
Log4J is a popular logging library for the Java programming language. In late 2021, a vulnerability was discovered that allowed hackers remote access to applications using it. Several vulnerabilities followed the initial disclosure, and attackers created exploits that were used in the wild. Variants included names like Log4Shell and Log4Text.
Apache Log4j Vulnerability Guidance - CISA, Critical Infrastructure Security Agency
SolarWinds
The SolarWinds attack used an IT monitoring system, Orion, which had over 30,000 organizations, including Cisco, Deloitte, Intel, Microsoft, FireEye, and US government departments, including the Department of Homeland Security. The attackers created a backdoor that was delivered via a software update.
The Untold Story of the Boldest Supply-Chain Hack Ever - Wired Magazine